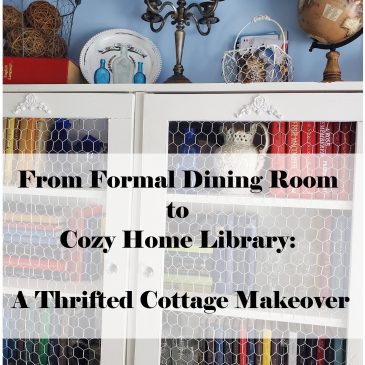
Hello My Dear Blog Friends,
Today I hope to inspire you to create your own DIY Board and Batten Wainscoting. My Master Bedroom Makeover is slowly but surely coming along nicely. I am happy to say that after weeks of working on the walls, they are finally finished!
I began by painting the walls before we put the new flooring in. I figured it would be easier since I didn’t care if paint spilled on the old, cruddy rug. I painted the top half of the wall a pretty soft blue and the bottom half of the wall satin white about 34″ up from the baseboards. Here is a photo of the room as the floor was being installed…..
To create the board and batten wainscoting I started with fourteen 1/2 inch thick 4″ X 6′ Fence Pickets at Lowe’s for $1.09 each. Each one was very rough to the touch so I sanded them smooth with my electric sander.
I painted each one a yummy deep chocolate brown.
Being that I am doing an Equestrian Theme in the bedroom, I wanted to give them a slightly rustic, shabby chic look. I went over each one with two coats of satin white paint using a dry brush effect so the brown would sporadically show through.
Once the paint was dry I cut off the rounded dog ear on the top of each picket, then cut each 70″ board in half.
I nailed each picket to the wall spacing them about 24″ apart, using a level as a guide.
Instead of capping it off, I stopped there and started on the damask stencil design on the upper half of the wall. I bought a large damask stencil off of Ebay and used a small roller to apply the paint.
I really was not loving the endless sea of beige damask on the wall. (this picture is awful, it looks orange. My apologies.) It was overwhelming and bland. I will show you how I fixed that issue in a moment.
Days later, when all of the stenciling was completed I moved on to capping off the Board and Batten Wainscoting. I bought a few 8′ long 1″ X 3″ furring strips at Lowes for about a buck a piece. Since they were cheap, they were not exactly straight. I ended up screwing each board directly into the wall studs so they would lay flush. I chose to counter sink each screw and followed up with Spackle to cover each hole.
Not looking too pretty here!
A few days later I went around the room caulking the gap where the board met the wall and also did this to each individual picket. It took me about two hours to caulk the whole room.
When that was dry it was time to touch up all the paint. You can see in the photo below what I did to the stencil design. Every few stencils, I went back in and lightly highlighted the design with a dark brown and pink. It makes the wall pop, gives your eye a place to rest. It looks amazing.
I took it a bit further and added a little bling to each highlighted stencil by sticking one of David Tutera’s Adhesive Rhinestones to the bottom. You can purchase them online or the bridal section of Michael’s Craft Store. Sorry I don’t have pictures of the finished look yet but it does give the room some added elegance.
And here is a larger view of my new walls and my version of a Board and Batten Wainscoting. What do you think? I love the look. It was a challenging and time consuming project but well worth it.
In case you are wondering why the bed looks a bit bland and low, well, it is! The mattress and boxspring is sitting on the floor because my bed frame is patiently waiting in my garage for it’s facelift. I also have a pile of fabric waiting to be transformed into a new coverlet for the bed.
Stay tuned to see how my master bedroom makeover is progressing!
Have a great day!
~Lisa
New to my blog? I would love for you to join me on my decorating adventures! Learn how to decorate on a budget creatively, get crafty ideas and be inspired to tackle your own design projects. You can subscribe via email below and never miss a post!
Linking Today To:
The DIY Showoff , Wow Us Wednesdays , Nifty Thrifty Tuesday , Transformation Thursday , Inspire Me Tuesdays